|
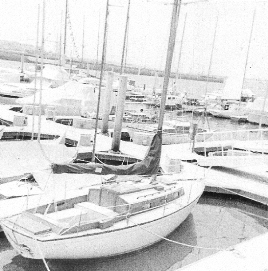
David Baumer discovered this Yankee and emailed this photo on June 15, 2008. She appears to have been down in the Gulf of Mexico and has a Dauphin Island Race/Shell Offshore Series plaque where her Yankee nameplate should be.
*************************
October 11, 2008
David sent in the following email (minor edit) and pictures -
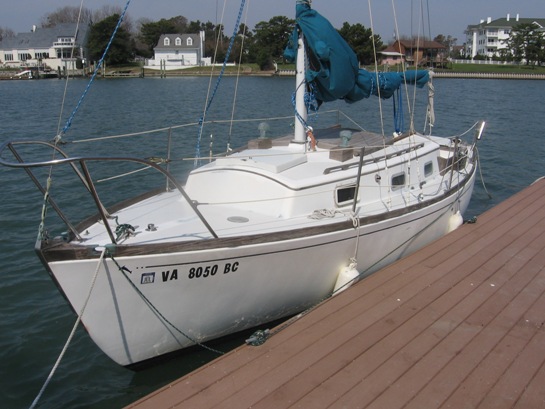
I wanted to write and let you know that I did purchase Yankee Dolphin 81 in June of this year. I rushed to get her trailer rebuilt and tucked her in my back yard where I plan to work on her. I purchased her with profits from a 16 foot 1961 Whirlwind Neptune Day Cruiser that I restored and let languish in my garage for years. It took about two years to sell the Whirlwind while I looked at sailboats.
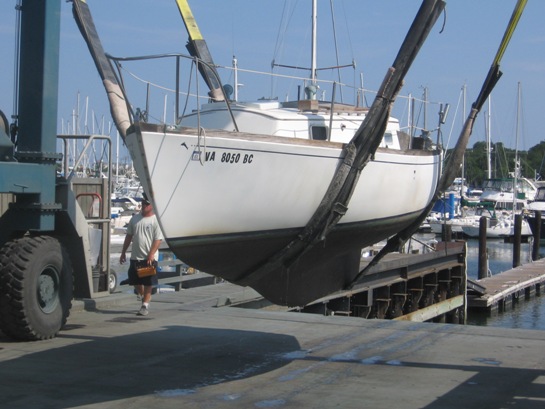
This summer I was able to purchase the boat, and completely rebuild her trailer. I also replace the shrouds so I could sail from her slip in the Croatan neighborhood of Virginia Beach around to Norfolk without the rig crashing down around me. At Cobb’s Marina in Norfolk I had her hauled, cleaned the bottom, and we put her on her trailer. Thus far, I have towed her home, built gates on both sides of the house to access the back yard, unpacked her gear and, cleaned her out. Now, I am in the process of documenting her condition and original structure, and making a plan as I save money for her restoration.
I have tons of photographs but no good way to share them with other Dolphin owners. I am thinking of setting up a web site and posting stuff there. I also have tons of questions about how Yankee originally constructed Dolphins with hull numbers in the low 80s. But, questions can wait a bit.
Aeyla Makaira. Aeyla is borrowed from the feminine Hebrew word "ayla" for “oak tree.” We inserted an "e" into Aeyla to give the first vowel a long "a" sound. Makaira is based on a Latin root word for "sword" and is the genus for which certain fish, such as the blue marlin and spearfish, are named. My wife claims the honor of naming the boat.
David Baumer
on her way to her new home

home - Dolphins have such sweet lines...
***********************
November 8, 2008 David sent in some pictures of Aeyla Makaira's transom well plug
I want to share some more photos of Aeyla Makaira (Yankee Dolphin 81) and thought the plug for the motor-well would be a good place to start. On the boats I had until now, outboard motors just hung from the transom (or on a spring loaded bracket that raised and lowered like we had on my Dad’s O-Day Mariner). Yankee Dolphin 81 came with a motor-well plug made from the piece cut from the hull. The cutout piece has a fiberglass flange and long handle fastened to it. The flange is made out of six tabs fiberglass tabs taped to the cut out with fiberglass cloth and polyester resin. The handle is a piece of teak plywood also taped to the cutout with fiberglass cloth and resin.
David Baumer
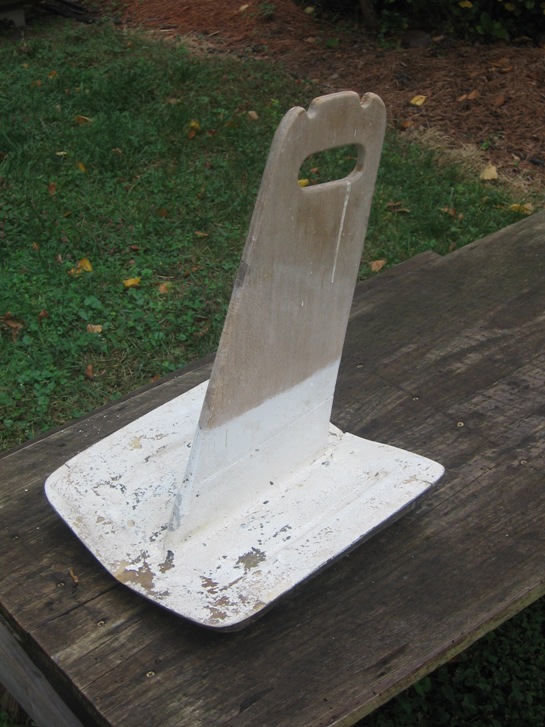
The Plug
Plug in place
These photos photos are included in the Technical Section's Aeyla Makaira page on this subject. Click to go there
***********************************
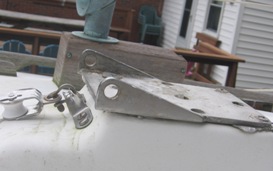
November 30, 2008 David sent in some photos and comments (minor edits) regarding Yankee # 81's hinged mast step. They are below, and also included in the Technical Section - Mast Tabernacles and Hinges.

Mast step arrangement of Yankee Dolphin # 81 in March of 2008
I am betting the hinging mast step on Yankee Dolphin 81 is original equipment. I took the accompanying photographs to document its condition and construction as I plan her restoration.
|
|
Note the arrangement in the photograph I took before I bought the boat. At the base of the mast is a cast aluminum step that is screwed to the top plate of a hinge oriented on the boat to fold aft. The step is screwed to the top plate of the hinge with four stainless flat head machine screws. The base plate of the hinge is tapped for the screws. The top plate of the hinge is constructed from a 5” x 7“ stainless steel plate with the corners rounded. The after edge of the plate is ground to a 45 degree angle and two pieces of stainless tubing 1” inch long are welded to it from both sided along the outside edges. This creates the top plate of the hinge. The short lengths of the stainless tubing, I assume, are designed to reduce friction when its time to tap the pin out. Note the corner is broken off next to one of the screws that fasten the step to the hinge, and I am looking for a new step and/or wondering if I can weld to cast aluminum? YES Between the top plate of the hinge and the cast aluminum mast step is a piece of what looks like thick black Mylar.
|
Securely fastened to the cabin top is the base plate of the hinge. It’s also welded up from ¼” stock. The bottom plate (5” x 7"x 3/8”) is constructed by welding triangular tapered flanges along sides of the after end (4 - ¼” long and 1 ¼” at their widest point). The flanges run past the after end by 3/16 of an inch. The flanges are drilled to accept the ½” pin. The stainless steel pin is ½” in diameter, 6” long, and has holes for cotter pins to keep it in place.
|
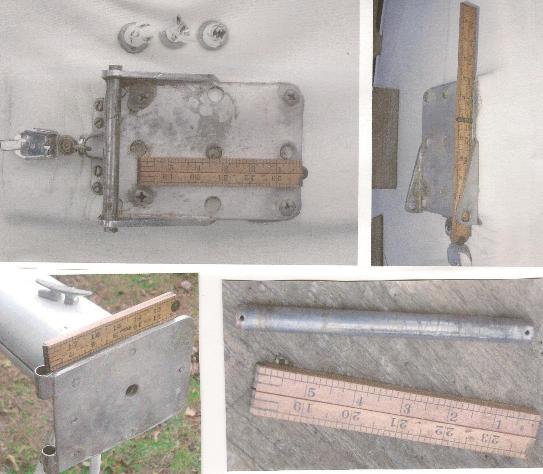
Key Dimensions of Plate Hinges
**********************************
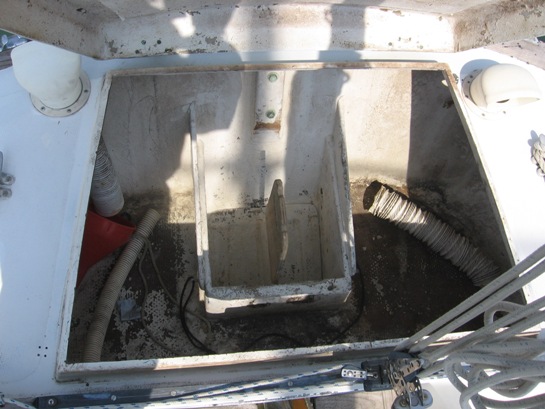
November 30, 2008 Dave sent in some more pictures and commentary (edited) on his centerboard winch which are below and repeated in the Technical Section - Centerboard Winches
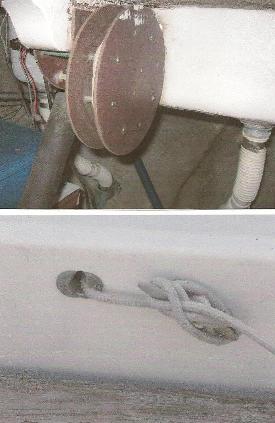
When I purchased Yankee Dolphin # 81 in June of 2008 I knew that both the centerboard and winch were both a concern. The board was stuck in the trunk and the fastenings that hold the winch together had oxidized and needed replacement. The board was hung with this awful green oxidization stained braded line.
At present, I am just planning a course of action to make both centerboard and winch new again. I want to both contribute and fish for technical information from people who may have worked this stuff out.
The centerboard winch is very much like the one that was on my Dad’s 1972 O-Day Mariner. We had that boat many years. I never had a single concern about the winch, its design, materials, how it came apart, or went together. It always worked flawlessly.
I took these photographs to document the condition of 81's winch before I bought the boat, or shortly after I got her home. I have added some observations, comments, and questions to go with the pictures.
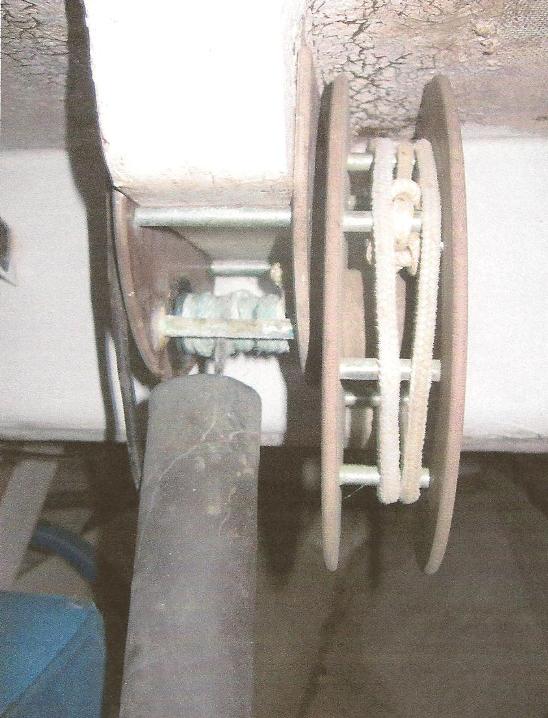
Centerboard Winch
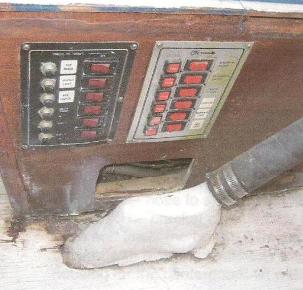
The winch hangs from a wood bracket that is fiberglassed to the bottom side of the bridge deck. The winch itself consist of a big spool (6“diameter) and a small spool (3/4” diameter) that turn on the same shaft. A line runs into the cockpit from the big spool. Another line runs from the small spool to the centerboard. I can only assume the centerboard should be hung with braided stainless wire not this tainted green line.
Mechanical advantage is acquired by turning the big spool by pulling line wrapped around it into the cockpit (up comes the board). Gravity pulls the board down wrapping the line back around the big spool (I wish gravity worked on my board - it’s bent and stuck in the trunk)
|
|
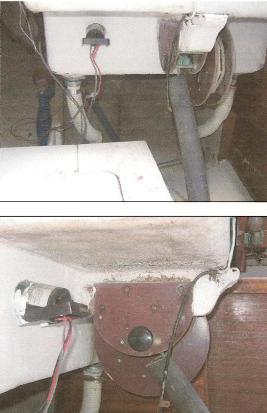
From the small spool of the winch a wire leads through a piece of hard wall exhaust hose to a watertight fiberglass bracket that I assume holds a sheave. The bracket changes the lead of the wire to the proper angle to raise and lower the board. The exhaust hose is fastened to the fiberglass bracket with two stainless hose clamps. This creates a waterproof housing for the centerboard lift wire well above the boat’s waterline.
|
Look at the rot in the plywood sole, after dinette seat, and awkward location of circuit breaker panels (the companion way steps land in front of them). Is the sheave or what changes the lead of the centerboard wire prone to deterioration from stray electrical currents and fresh water soakings? I wonder, what is really inside that bracket? We all do..
|
|
|
The winch is fastened to the wooden bracket with bronze screws. Note the green powdery look to the fastenings that hold the winch together. It does not make me too confident that the winch will stay together with out refastening.
The whitish/green corrosion product is a mystery that I will solve when I get in there remove the winch from the boat.
A big plastic washer around the shaft separates the bracket with the small spool from the big spool on the port side. On the starboard side of the winch there is what I will call a plastic button bushing that holds the shaft.The big spool is constructed with a 2" diameter cylindrical core made of the same composite material as the majority of the bracket. I wish I could remember what that stuff was called in the late 1960s and 1970s. (Formica, melamite - melamine impregnated paper.
|
The six inch spool is created by what appears to be stainless steel or chrome plated brass spacer tubes with through rivets fastening the sides of the spool together. If they turn out to be chrome plated brass tubes that may be the source of the greenish white oxidation product? At first, I assumed that the winch was held together with long aluminum rivets that ran through aluminum spacer tubing. I guess I will find out when I pull it apart. Does any thing related to the centerboard require lubrication? If so, what will I use?
Webmaster Note: Marionette used waterproof grease on the bearing surfaces of the axle pins - 12 years ago, and then again 2 years ago, nothing in between. Probably regular grease would be fine. No problems
The plastic bushings are worn out and I am researching suitable replacements. RWO Screw Down Bushings are similar and available from Annapolis Performance Sailing (R3112, aperture 3/8”) http://www.apsltd.com/Tree/d3000/e534.asp
|
**********************************************
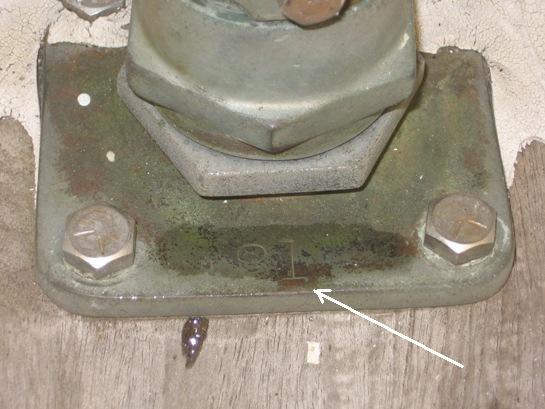
September 7, 2009 David has not found Ayla Makaira’s nameplate but has pretty good evidence that she is Yankee # 81. Here's more in his email and photo received today:
The Yankee builder’s plate from Aeyla Makaira was missing when I purchased the boat. I was lucky enough to be left a few clues to the hull number. First of all, there was the number 81 stenciled on the sail bags in black. Also there is sail number 81 on the main sail. Finally, the cast bronze cockpit rudder shaft fitting is stamped with the number 81. It may be hard to pick up in the photos, but I wanted to share.
Aeyla Makaira, Yankee Hull 81
**************************
November 3, 2009
|
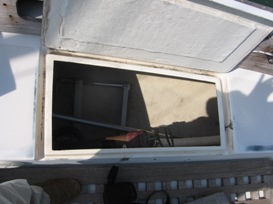
David sent in an email and photos regarding Aeyla Makaira's hatches and specifically her fiberglass cockpit hatches - and this gives us an entree to revisit Yankee's early days. Aeyla Makaira is a Yankee transition boat. Yankee's first four boats were built in late 1964 and 1965 on O'Day supplied fiberglass hulls with Yankee built wood decks, cabins and cockpits. Yankee. now Charlie Drew's Arion, was the first boat. The next few boats were progressively changed to more fiberglass components - probably with a few fits and starts. Part of this transition was a new, updated Dolphin 24 design.
Sparkman&Stephens was having continuing problems with O'Day supporting and producing enough Dolphin 24s to meet the market needs. Having heard from O'Day that there was a guy building Dolphins on O'day supplied hulls and finishing them to Mermaid 24 (wood Dolphin) plans, at some point in 1965 Olin Stephens visited John Shumaker, Yankee's founder, to discuss with him the possibility of becoming a west coast builder of the Dolphin 24. In addition to getting a new builder this gave S&S an opportunity to use some of the field data they had been collecting about what owners were doing to race their boats more competitively, and, In 1966 S&S issued design #1497-2 named "Yankee Dolphin" with 200 lbs more ballast and 200 lbs lower displacement, an improved rudder design and dual lower shrouds.
John Shumaker visited O'Day's plant to inspect and possibly buy the O'Day tooling but decided to build his own. They gradually built their tooling in late 1965 and 1966 to produce all or most components in fiberglass. There are gaps in this story which may never get filled in, but this seems to fit the available evidence.
|
|
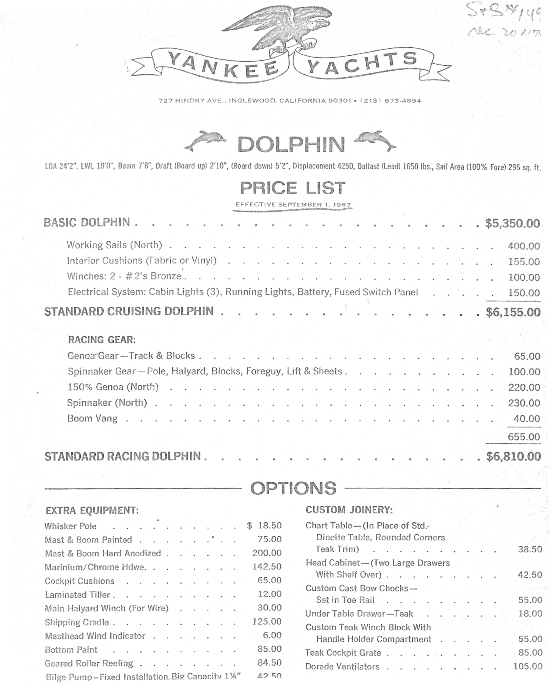
Back to cockpit hatches, Yankee had a well deserved reputation for its woodwork, and its supplier H&L Marine Woodwork contributed substantially to this reputation. The 1967 Yankee sales brochure at left has # 80 on its main sail so she is, maybe, a sister ship to Aeyla Makaira, # 81. Its hard to tell what kind of cockpit hatches she has - her transom hatch is glass, and her main and fore hatch are wood, as are her combings, Click here for a large view. Yankee's 1969 price list offers teak hatches as an option whereas the 1967 price list does not mention any hatch options
|
So with that intro here's David's email and photos.
Hello Ron,
Erik Evens comments about Yankee making a transition to fiberglass hatch covers after hull 114 really got me thinking about your observation that Aeyla Makaira, Yankee Hull 81, is an interesting transition boat. While looking at photos of other Yankee built Dolphins on your website, I often puzzled as I observed wooden cockpit hatches on Yankee hulls with higher hull numbers than my boat. Feather (Yankee 104), a good example, has teak hatches. In 1967 Yankee built hull 81 with fiberglass cockpit hatches. I wonder if the hatches resulted from a customer request, an experiment, or just a quirk? The more visible hatches on hull 81’s house top are fabricated of teak, mahogany, and fir plywood. Someone subsequently glassed over the forward hatch and painted it white; I guess to strengthen and or hide repairs.
Aeyla Makaira’s cockpit hatches are fiberglass and a bit unfinished. Perhaps the molds came out too big, because the outboard edges and ends appear trimmed to fit the hatch openings. The hatch covers were later stiffened by fiber glassing (I am guessing) foam panels to the bottom to of the hatch.
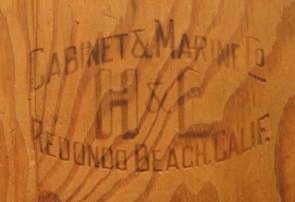
The hatches look nice closed. Opened, their interior finish and fit is rather crude; and I can understand why Yankee may have reverted to teak hatches. Perhaps it was cheaper and easier to subcontract teak hatches from H. & L. Cabinet and Marine Co. of Redondo Beach? This company prefabricated a lot of the interior work for Yankee any way. Their stamp is burned into all the drawers built for hull # 81.
David Baumer
Webmaster Note: This discussion on hatches is repeated in the Technical Section on Hatches, Combings, Trim, Toe Rails and related.
****************

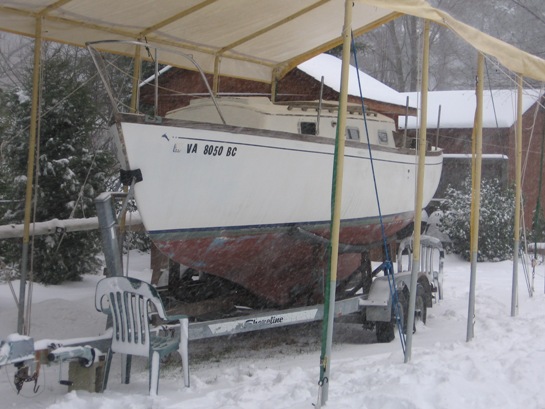
December 18, 2009. David sent in his '2009 Summer Report' with lots of photos. We have given this report its own page in the Restoration Section. Click here to go to it.
February 12, 2010 - This above enclosure has come in pretty handy with this particular winter's weather. Here's another shot of it.
**************************
August 18, 2010 - David sent in an update (minor edits) on #81's restoration, and a copy of an October, 1960 Popular Boating Magazine article - which is posted in the History Section - click here to go to it
Ron,
An old friend and I reconnected the other day. When he found out I had a Dolphin he pulled this article out of his archives to share. It's from Popular Boating Magazine (October 1960). I did not remember seeing it posted on your website and thought I would pass it along.
I must report the restoration of Dolphin 81 is moving slow. It's gotten a little hot down in Virginia Beach and that makes lots of stuff move slow. I have managed to accomplish the following:
- remove the starboard side of the forward bulkhead
- remove the sole in the center compartment
- grind out the fiberglass tabbing for the above listed items
- fit a new soul of 3/4" marine plywood
- carve out rotten spots along the starboard sheer clamp and epoxy in "Dutchmen"
- replace the sheer clamp boards I removed last summer on the port side (under the bow pulpit)
- remove all the V-Berth framing
- grind out the fiberglass around the wooden cleats that the V-berth was attached and replace some rotted wood
- restore the V-berth cleats with a coat of glass and epoxy and then grind them smooth.
- scrape and sand out three layers of paint in the V-Berth area.
- fit the new bulkhead on the starboard side
- fasten the bulkhead to the hull with epoxy and fiberglass tabbing
- rebuild the V-berth framing and prepared it to paint.
That's all I can recall at the moment and it's a longer list than I thought. I am about to remove and fiberglass the forward port lights closed. I managed to find a set a set of port lights that are almost right, but I am still looking for a set of two port lights to match the other four on my boat. The ones I found are an inch short and have a single radius at the ends; they'e also a little beat up. I really want to match the port lights on my Dolphin. They are 14" X 6-1/8" and are more rectangular in shape. Please let the Dolphin community know I am still looking for port lights.
I will send a more extensive report with pictures after my summer break from teaching. I have to sign off and attend to some other father duties.
David Baumer
****************************
February 16, 2016. We got the following update from David -
Hi Ron,
I am sorry to report that I am having a hard time working on Aeyla Makaira. She is still under her canopy in my back yard (relatively clean and dry). My energy is going into teaching oceanography, raising teenagers, and renovating rental properties in Virginia Beach. For the past few years it feels like I put more energy into maintaining baseball fields at the Little Creek Amphibious Base than working on my Yankee Dolphin. I am still looking for a pair of period fixed ports to replace the plastic Becksons that came on the boat. My boys are trading baseball for football this year, so perhaps I can get more done this summer.
I will get in touch later when I have more time to write.
David Baumer
************************************
|
|


