|
December 18, 2009
David Baumer has been dilligent in documenting Aeyla Makaira's progress through her restoration. Some of this appears directly on Aeyla Makaira's page. Here is David's 'Summer" 2009 report and photos (minor edits).
Aeyla Makaira, Yankee Hull 81, Summer Report
Hi Ron
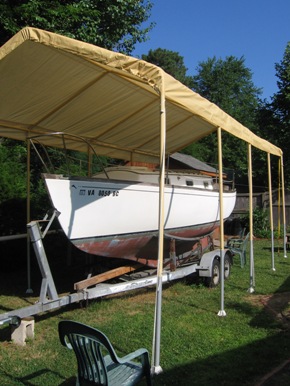
I can report moderate progress on the restoration of Aeyla Makaira this summer. First of all I purchased a 12’ by 26’ canopy from Pep Boys and erected it over the boat. Virginia Beach summers are blazing hot and the morning sun was blaring down on deck. The cover also eased my fight with the crud from nearby pine and hard wood trees. I was able to remove much of the deck hardware, and the winches off the mast
 |
I spent many hours documenting how the boat was put together and planning how it will go back. I slowly removed the plumbing, electrical systems off the boat, organized, and stored gear, hard ware, and fasteners.
I kept my digital camera close (took hundreds of photographs) and stored most of the parts with the fasteners that secured them to the boat. I gave most items an initial cleanup too. I am compiling long list of things to purchase in order to restore or replace: hull, interior joiner work; coatings, plumbing, rigging, and electrical systems.
I purchased quite a stash of epoxy products from a nearby Boater’s World store that went under; and Tufnol type plastic laminated blocks and sheaves from R & W Rope Warehouse.
|
 |
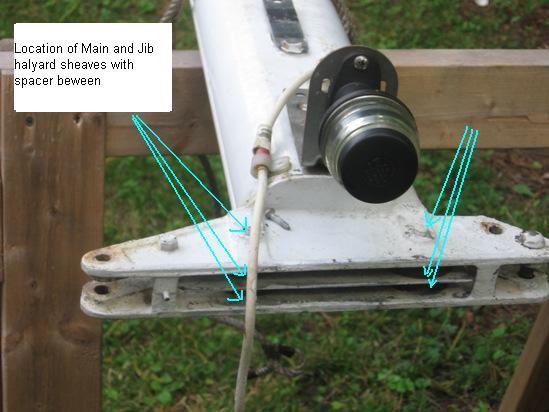
The Tufnol type plastic laminated blocks are close replacements for the blocks I took off the mast head. I removed two laminated Mariner blocks (spinnaker halyard, and boom lift) and 4 mast head halyard sheaves (for heads sails and main sail). The old sheaves in the mast head fitting were 48 mm in diameter, 11 mm thick, and had a 10 mm bore. They spun on 3/8” (9 mm) pins that ran through a cast aluminum mast head fitting. A 1/16” aluminum plate separated the head sail and main halyards. One of the original mast head sheaves was falling apart.
|
|
The replacements are 40 mm diameter, 11 mm thick, with 8 mm bores. I bought the largest diameter 11 mm thick rope sheaves that R & W Rope Warehouse carried in the Tufnol type plastic laminated material. I could have chosen 50 mm diameter wire rope sheaves, but I want to continue using braided line halyards on the boat they were new. I am speculating the original halyards were stainless wire spliced to three-strand Dacron line. I may well go back to that traditional early seventies look and splice up new halyards. I will try the current arrangement first and worry about halyards later.
|
 |
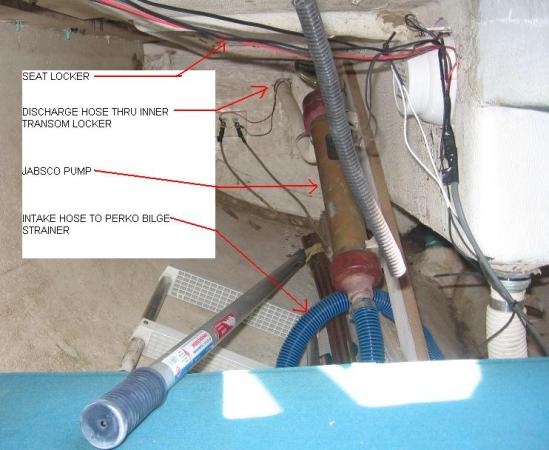
I concentrated on the plumbing early in the summer, removing the bilge pump and what remained of the fresh water system. The only bilge pump on board the boat when I purchased the boat was a Jabsco brass and rubber hand pump screwed to a board and fastened inside the starboard cockpit seat locker. The pump still retained its original price tag ($80, purchased from Houser Marine in Foley, Alabama). The bilge pump featured a very nice low profile cast bronze Perko bilge pump strainer, snugged to port of the centerboard trunk under the cabin sole. From the Jabsco hand pump a hose fed through the center of what I will call the inner transom and drained into the motor well.
|
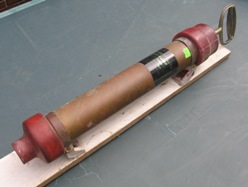
I am still considering what bilge pump arrangement I will put back into the boat. The Jabsco pump never primed the short time I had the boat in the water (never enough water in the bilge). I have no idea how much water it will move (if any). I plan clamp it down to a bench and pump some water out of a five gallon bucket, and then maybe pull the top off to inspect the innards.
Next, I removed a vent from a long gone water tank formerly located under the forward V-berth. I also removed a clear plastic hose for fresh water leading from the non-existent tank, along the base of the cabinetry on the port side, to a non-existent hand pump next to the sink.
 |
The head came out next. The head sat on a base made from three African mahogany boards fitted and fiber glassed to the hull with a piece of ¾” birch ply wood screwed to the top. The birch plywood, a recent addition, soaked up its one coat of white paint along the edges and began to delaminate. The head was thru-bolted to it. No previous owner ever added a holding tank to the head. The head pumped seawater from a ¾” seacock and discharged waste water straight overboard. Waste water exited the head through a 1 ½” black rubber sanitation hose that ran up the after side of the forward bulkhead with a Groco bronze vented loop at the top and then back down to a 1 ½”seacock.
|
 |
H. & L. Cabinet and Marine Co. of Redondo Beach (click to go to their website) built all the cabinetry in Yankee Dolphin 81. The cabinet behind the head, (two drawers with a flat shelf top) was designed and prefabricated to be easily installed and accommodate the vented loop in an upright position above the boat’s waterline. It’s going to come apart pretty easy too, what the ants haven’t eaten. The prefabricated part was screwed in from the back side of the after bulkhead and then connected to the forward bulkhead by mahogany flashing pieces screwed to cleats. The cleats were secured from the forward side of the bulkhead by bronze wood screws and puttied over with mahogany colored putty.
|
The design is light and allows access to the vented loop with the drawers removed. The vented loop was fitted into a carved wooden bracket to which it was screwed with brass screw. The bracket for the loop fastened from the forward side of the bulkhead with bronze screws which were also puttied over with mahogany colored putty.
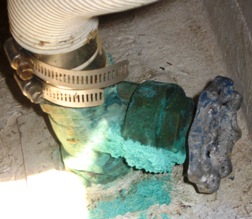 |
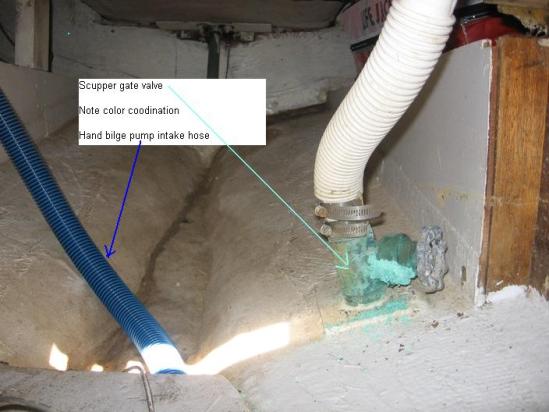
Most of the seacocks on board Yankee Dolphin 81 looked like the one for the port cockpit scupper illustrated above. I removed all of seacocks on board and made a note about how well they worked:
> Seawater intake to the head ¾” (ball valve by Wooster Valve Co., opened and closed ) see picture above
> Overboard from for the head 1 ½” (ball valve by Wooster Valve Co., opened and closed)Port scupper 1 ¼” (gate valve, would not close more than half way) - directly above
> Starboard scupper 1 ¼” (gate valve, opened and mostly closed)
> Sink drain ¾” (gate valve, frozen in the open position)
|
 |
Taking old corroded stuff apart can sometimes be difficult. I tried to disassemble the seacocks, but could not get them to come apart. The first one I tried just separated from the hull and spun in its hole. Hence, I just put a new blade in my sawzall, a cut off blade on my grinder, and did what came natural. I cut the thru-hulls off at the lock nuts with the sawzall, and cut the lock nuts into four pieces with the grinder cutoff blade. With a little help from a hammer and chisel, what was left of the thru-hull locknut came off with relative ease.
|
 |
 |
 |
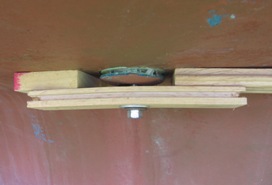
I then pulled the thru-hull fittings out with a “nut” and bolt from a steering wheel puller, wood blocks, and a socket wrench, just like Don Casey illustrates in one of his books. In the image at the left, I was just about take a second bite with my make shift thru-hull puller. After I took the picture, I climbed aboard and screwed the “top nut” on to the bolt I used to pull the thru –hulls out with. The only thing holding bolt and that scrap hard wood flooring was a narrow red oak batten that I stuck in a hole drilled into the wood. Working by your self can get interesting at times
|
Later I removed the plywood pads on which the sea cocks rested. To my surprise, goaded with a 1 ¼” chisel and a wooden mallet, they came off in one piece. Still waiting to be pulled out are the thru-hull fittings for the sink drain and head discharge as they are currently pressed to the top of the trailer bolsters by the hull.
 |
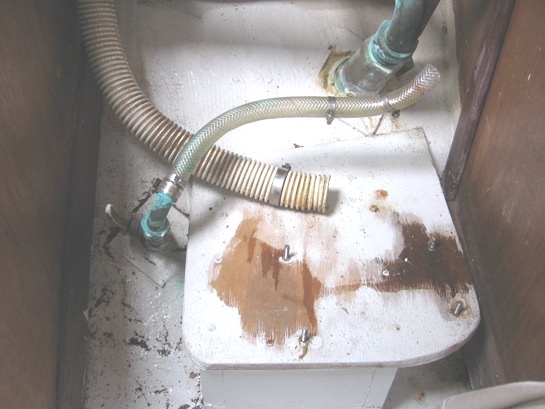
I am also neglecting the drain tubes from the ice boxes. There are two molded fiberglass ice boxes, both with sink drains at the bottom. In the forward port corner of the cockpit a hatch allows accesses a (14” x 17 ½” x 17 ½”) ice box, and connected to its forward side is a galley ice box (same size). The ice boxes appear glued together and connected by a 6 ½” x 8” rectangular cutout.
|
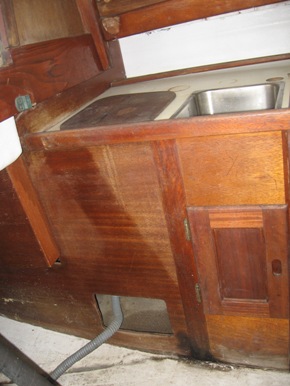 |
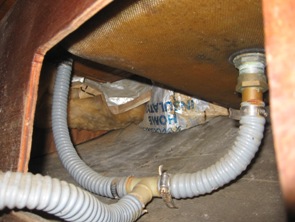
Both ice box drains have tubes that run from their bottoms to a T-fitting, then out a large rectangular hole (crudely enlarged vent?) in the base of the cabinetry, and finally down into the bilge via a hole cut through the cabin sole. I am not sure I like that arrangement and am pondering other options. I wonder how many other Yankee Dolphin owners have duel ice boxes and where they drain off big blocks of melted ice?
|
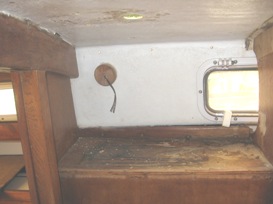
Also over the summer I removed the boat’s electrical system. Electrical components on board when I purchased the boat included:
- 12 volt Battery with a tray and box
- Charging wires running to the battery from a plug that connects to the outboard motor generator (an 8 hp Nissan made by Tohatsu)
- Two circuit boards and switch arrays (the rats nest of terror)
- Navigation Lights:
- Running lights on the cabin sides
- Stern light
- Mast head light (anchor light)
- Spreader lights
- VHS Radio
- AM/FM stereo CD player with two speakers in the cockpit
- Depth sounder and transducer
- Cabin lights:
- Head compartment
- V-berth compartment
- Main cabin (port and starboard)
- All the wiring leading from the two circuit boards to the above listed electrical components and back to the battery
- A gasketed shore power inlet connected to a short triple outlet pig tail extension cord
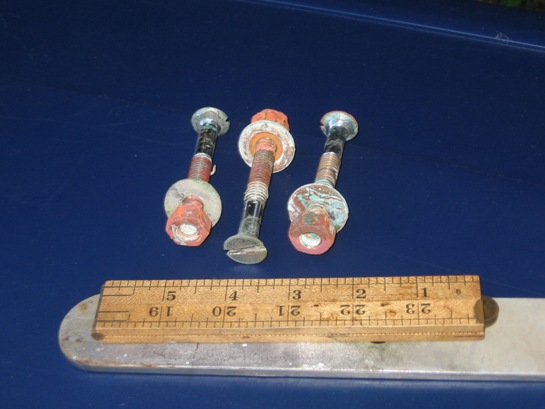
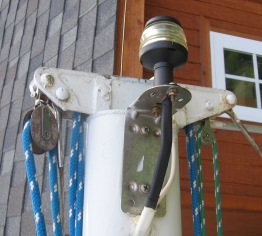
The chain plates for the head stay and the back stay also came off. These items are made from stainless steel and are in great shape. The reason the condition is so good is the selection of materials for the fastenings. Yankee used silica bronze machine screws which are chrome plated from the head to the threads. The screws pass thru chain plates, hull, a teak backing cleat, and a brass flat washer. All this is pulled together with brass nuts. The brass nuts, being the most susceptible to galvanic corrosion, sacrificed themselves to keep the stainless rigging and chain plates in good shape. I think Yankee made a wise choice of fasteners. I want to put it back this way but, have not found a contractor to chrome plate the heads of new machine screws for me. The chain plate nuts are easily assessable, inspectable, and replaceable.
 |
 |
I removed the bottom piece of the mast step hinge, stainless eye strap to anchor the boom vang to the cabin top, Dorade boxes, genoa track, 3 thru deck cable outlets for wires exiting the cabin top going into the mast. You would be surprised how dirty things get when you do not take them apart and clean.
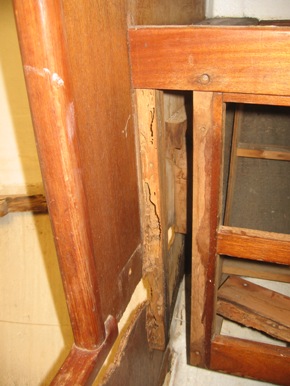
I also started the sad task of pulling out rotten wood from the interior of the boat. I really tried to restrain myself as I am not quite ready to start rebuilding the interior. I plan to replace the forward bulkhead on the starboard side first. There is just too much rot to save it. Ants ate some too. I am making a materials list and will soon purchase wood, fastenings, and fiberglass cloth to attach the wood work to the hull. After the forward bulkhead is replaced, I will stain it to match the port side. If all goes well, I will save the port side of the forward bulkhead. I really want to save as much of the original wood work as possible. After the forward bulkhead is complete, then I will remove all the V-berth framing and replace it back the way it was. The V-berth is lightly framed in a wood I do not recognize. The faming is just glued to small fiberglass tabs attached to the hull. I plan to re-frame in white oak and have not chosen replacement plywood for the beat up fir plywood that’s there now. Anybody have a clue what material and finish Yankee gave the original V-Berth in 1967? My gut tells me the painted fir plywood I found in the boat is the original. It’s laid out in three sections with the after two connected by hinges.
 |
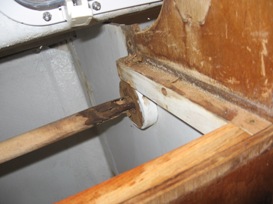
When I started to remove rotten wood out of what I will call the “clamp” or toe rail cleat, I had all sorts of questions and reservations. This toe rail cleat is a series of boards that were used to strengthen the hull to deck joint and create a stable flat surface to distribute the load of fastenings along a thin fiberglass tab that projects into the hull just below the sheer. I guess the technical term for this fiberglass tab is the clamp. The deck attaches to it. I started by removing an experimental section below the bow pulpit on the port side. It had rotted where the thru fastenings of the bow pulpit had leaked and soaked the wood. As I pulled out the rotted wood and inspected the remaining cleat with a hammer and a chisel, I encountered lots of fasteners. What follows is a summary of what I found: |
- Silica Bronze screws go thru the fiberglass sheer clamp, and then into a mahogany cleat that backs up and stiffens the sheer clam and hull to deck joint. These screws are in line underneath the toe rail.
- The toe rails are thru fastened with Silica Bronze machine screws with nuts. Some of theses machine screws more resemble hex head bolts with a screw driver slot cut into the head. Yankee counter sunk the screws into the toe rail. They run thru the toe rail, deck, fiberglass sheer clam, and its mahogany cleat. The screws had bronze flat washers and nuts. All of the fasteners are still in good condition for the time being. They do not want to budge thus far but the nuts come right off with the twist of a wrench. Teak bungs covered the screws at one time on the toe rail. Some of the bungs are still holding on.
- The bow pulpit and life line stanchions bases are thru fastened with stainless machine screws with flat washers and lock nuts. Most of these screws land on the mahogany cleat (a few landed inboard of the cleat). The bow pulpit has little teak wedges under its feet to make it fit a little better.
- Finally stainless chain plates are thru bolted thru the deck, fiberglass sheer clamp and mahogany cleats for all six shrouds. In the area beneath the shrouds Yankee added a second layer of mahogany cleat to better distribute the stress along a greater length of the hull to deck joint
What I found draws me to speculate on how the hull went together. First let me describe my observation of the hull to deck joint. A thin fiberglass (about 1/8” thick) sheer clamp protrudes into the hull all the way around the sheer. The clamp is stiffened with mahogany cleats (¾” thick and about 3” wide) underneath all the way around. Yankee glued with polyester resin the sheer clamp to the cleat. Silica Bronze screws go thru the fiberglass sheer clamp, and then are buried into a mahogany cleat that backs up and stiffens the sheer clam and hull to deck joint. Yankee employees put a layer of polyester resin between the deck and the clamp. My gut tells me that they screwed thru the deck, fiberglass sheer clamp, and mahogany cleat with the silica bronze wood screws. However, this is speculation on my part, because the tops of these screws line up with and are presently hidden under the toe rail. It’s possible that the wood screws only go through the clamp into the battens and the fastenings for the toe rail are the only thru fastening for the hull to deck joint.
There are places where the cleat is rotting. I plan to chisel out as little as possible and epoxy in Dutchmen. I do not want to pull out that cleat there are way too many fasteners to deal with. I also want to take the toe rail off, repair the damaged areas, and refasten with new bungs and something like 3M 5200. I really do not wan to cut the teak toe rail off and replace the whole thing at $26.00 per board foot. Ideas are welcome.
The two drawer cabinet above the head will need a lot of work and the hanging locker too. I have pulled the top off of both and taken a very rotten hanging rod out of the hanging locker.
Much work awaits the spring and summer months of next year.
***********************
|
|