 |
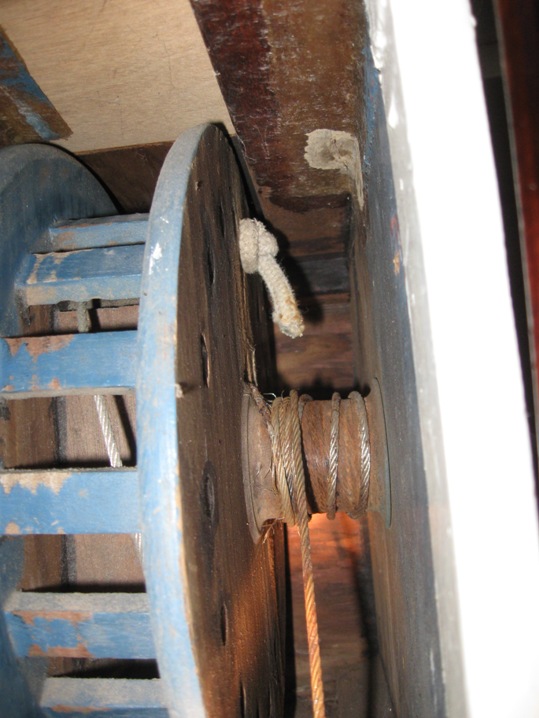
November 22, 2010. Last summer we noticed that the centerboard pennant on Marionette had started to fray so another project was added to the Fall list. I consciously used the centerboard less in the latter part of the summer as the fraying seemed to be getting worse. Marionette's CB winch is a 2 part system with a larger wood drum/reel for the rope control line and a smaller steel sleeved/wood core drum for the stainless steel wire. They are separate lines but rotate on the same shaft giving a mechanical advantage of about 3 to 1. The lines dead end in a knot - the rope control line on the outside of the wood reel, the wire, inside the wood reel (never did see the end but the loose end is visible inside the reel - see below. |
The winch is enclosed in a locker under the bridgedeck. For another picture of this winch, and more on this locker, the adjacent electrical panel and storage locker click here.
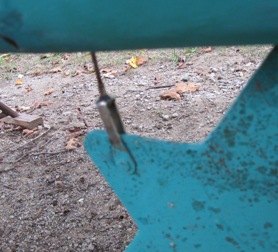
This seemed like a pretty straight forward project - cut the existing 1/8" diameter pennant at the centerboard shackle (see above left), attach a messenger line to the old pennant, pull the old pennant up through the rollers in the tube (see above right) tube, cut off the old pennant as close as possible to the point where it enters the wood reel, and basically reverse the process with the new pennant. However....as usual, not so fast. The messenger, a 1/8" hard finish, high quality cord was taped end to end with old ss pennant - where the old ball detent had been cut off. (Note" tightly tape the wire where you plan to cut it)
The assembled wire/cord wanted to 'stick' at the rollers that are in the bend at the bottom of the tube where it goes below the floorboards. It took a bit of gentle tugging but it finally came through. The messenger was tightly taped end to end to the old 1/8" wire with electrical tape, presenting, I thought. the smallest possible 'obstruction' to passing through the rollers in the tube. The possibility that I was going to pull out the wire losing the messenger was unnerving.
This tugging scenario caused a few restless nights thinking about the unthinkable - the messenger parting from the new ss pennant while trying to bring it up through the tube! Thanks to a tip from the guys at Sound Rigging in Essex, CT, who made the new pennant ($36), a decision was made to use fiberglass reinforced tape to tape the new pennant to the messenger.
But still, sound sleep did not come until 3AM one morning a solution came to me. Tightly tape the new pennant at the midpoint!! of the long messenger - side by side! This would make a larger point of entry but no risk of pulling the messenger out of the tube if the attachment taping failed during aggressive tugging. The tape was a 3/8" wide, clear, fiberglass reinforced tape (gratis from Sound Rigging). The idea was that the glass reinforced tape would allow pulling as hard as necessary to pull the 'assembly' through the rollers/tube. If there was a failure, the messenger would still be in place for another try, or another idea. The tugging was harder than pulling the old pennant out, but it worked!
A step back - at first I hoped this procedure could be done on the trailer. Nope - see below left. I had to take the boat off the trailer and dig a small hole under the centerboard so it could get to the fully down position and expose the shackle. Naturally, this required use of the "No Travel Lift" system to get the boat off the trailer. Those unfamiliar with this procedure should click here.
|
 |
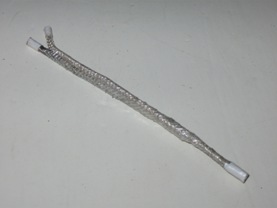 |
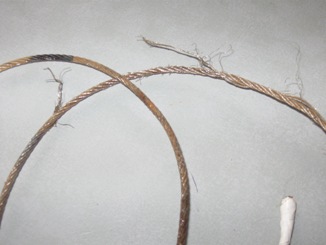
The stainless steel shackle was in excellent condition (above right)- good thing because this might be a hard shackle to find new!. The picture at left is the pig tail left after I cut off both the messenger and the end of the new ss pennant. The two pieces were side by side and tightly wrapped with the fiberglass tape. I wrapped the new pennant a few turns tightly around the winch drum to take the most of the load and then led the tail through a 3/8" hole I drilled in the drum.*****See BELOW! used a long drill bit I, luckily, happened to have. I made 4 simple knots in the tail of the wire slid them down the tail of the pennant to the hole, and snugged them to the wire where it exited the hole. It took a couple of tries to get the wraps on the rope drum, and the wraps on the wire drum, just right. A couple of ups and downs of the board convinced me that it was done, and it was time to close up the boat for the winter. |
*******************
November 4, 2011. So, what happened in the summer of 2011 cruising in Maine? Nothing - a good thing. I kept waiting for the wire to detach and come up through the exit hole in the back of the bridge deck, leaving the centerboard in the down position. It did not happen.
************************************
Update September 10, 2013 In the summer of 2013 I had a failure of the joint between the large drum for the rope and the small drum for the wire. The two drums were no longer turning as one. This story and its repair is covered on a separate page in our technical section. Click here to go there. The reason behind the joint failure is not clear, perhaps 'old age', but perhaps drilling that small hole in the small drum and dead ending the ss wire on the other side of the drum was not a good idea. The original deadend was threaded thru a hole in the side of the large large drum. The dead end of the ss pennant now goes into the side of the large wood drum avoiding what might have been a structural issue with a hole thru the small pennant drum. In both cases, old and new, there were already several wraps on the drum when the board is in the fully down position.
|
|