|
The discussions for this thread include the following:
Posted: 20 Sep 2012 at 6:07am
Alan Mountford is restoring Blue Gum - See
http://www.dolphin24.org/blueGum.html
He, and I, would be interested in ideas on how best to hide, disguise, make less visible, exposed wiring in the boat. Where possible/feasible
he has run it under lockers, behind panels, etc. but sometimes its just there. One thing that immediately comes to mind is to use non
contrasting color wire – ie., brown, maybe black against brown/mahogany background
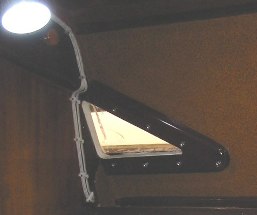
Below an example - wiring to light
Ron
Marionette, #12
Posted: 20 Sep 2012 at 11:18am
I don't have any advice on that issue, but I'd like to hear about his restoration and the wood around his forward hatch. Lovely. Did he use
different types of wood or simple]y different stains? And how is it mounted? I assume some type of cross pieces under? I've thought of using
beadboard, either wood or maybe a realistic plastic sheet they have now. It's easy to install and has the added benefit of being thin so it
will bend slightly and also not cut into precious cabin space too much.
David Williams
Posted: 20 Sep 2012 at 11:36am
I plan to either paint or cover all of the laminate faux wood in my cabin. Now that I think about it, another benefit to use of beadboard or
other covering is that it provides a surface to conceal any runs of wiring.
David Williams
Posted: 20 Sep 2012 at 11:26pm
My boat is a Kiwi built S&S 24 Falcon and the cabin top is a glass/balsa sandwich.
I lined the inside of the cabin top (fwd and main cabin) with Canadian Red Cedar strips 50mm (2 inches) wide and 4mm (3/16th inch) thick
I arrassed (champhered) the edges about 1.5mm x 1.5mm (I/16th inch x 1/16th inch) before gluing them on with epoxy.
(Fibreglass was first sanded with wheel that looks like a course pot mit held in a hand drill - often used for stripping paint)
They were held in place with small PK screws spaced about 350mm (13,3/4 inches) apart until the glue set.
The screws were then removed and the holes filled with coloured epoxy filler.
I bought lengths of rough sawn cedar 6 x 2 inch and ripped the strips through a bandsaw about 6mm (1/4 inch) thick. Then put them through a
thicknesser.
Then I set up the circular saw and ripped a fraction off each edge.
Then they were put through a sanding machine on one side (seen side)
I then ran the strips on a router table with a 45 deg cutter to make the arras (champher)
Once all in place the strips recieved several coats of clear polyurethane
The wood around the hatch opening is Australian Hoop Pine again just painted with clear polyurethane
|
|