|
Halsey and your webmaster exchanged a few emails about some problems he found with Elizabeth's sheer clamp that spread to the main bulkhead. These are familiar problems to many if not most early Dolphin owners. They are below.
Subj: infamous sheer clamp
Date:4/2/2008
hey ron,
i was wondering if you could offer any advice concerning the "infamous" sheer clamp. after surveying my boat for the coming season i found some rot in the ply wood at the chain plate and sheer. a chisel and inquisition has proved it to be mostly all rotten. at first my thought was to just replace the bulkhead and scarf a new piece into the sheer, but the sheer is soaked and soft. as all projects, this one is way more involved than first thought. i think i might have to replace the whole clamp. i was just wondering if you had any thoughts/ info about it.
thanks.
halsey
****************************
Hi Halsey
As you probably have read, this annoying problem has been addressed by the Git Rot approach and progressively all the way to removing the deck and cutting out, replacing and reglassing the clamp.
As far as the clamp itself my experience has been, fortunately, limited to the Git Rot approach in areas of the chainplates, the port and starboard quarter stanchions, and the area under the toe rail genoa track. The combination of stress in these areas and dried out caulking/poor bond on fasteners allow a leak that over time gets to the wood and rots it. You can usually see tell tale stains around the problem areas particulary the nuts on the bolts holding on the toe rail and genoa track.
Marionette has a plywood deck and her clamp is heavily fiberglassed. I did not have problem with rot in the bulkhead, just a small area on the deck around the chainplate. Here's what I did just this past fall.
1. I drilled a series of small holes in the deck around the suspect areas until I reached wood tailings that were not damp - in my case within 2-3 inches
2. In these same areas I drilled a couple of small holes into the glass under the clamp and put a piece of duct tape tape over the hole
3. I countersunk larger holes on the deck side and start dripping Git Rot until I see evidence under the tape below that it has reached the bottom, and just filled the holes with the stuff - patience, takes a while
4. I removed the chainplates and checked the intergrity of the wood bulkhead and bolt holes - no problems. Then I heavily coated the chainplates and bolts with silicone, let them dry and reinstalled the chainplates
5. Then I repeated 1. 2. and 3. around the chainplate area.
6. Since Marionette has a painted wood deck I sanded the area and repainted the deck - which it needed anyway
7. Then I recaulked the chainplates at the deck
With Passage - a standard construction O'Day - the deck is fiberglass. This boat has been out of the water for 5-6 years and is drying/dried out. We will use/have used the same approach. The non skid was mostly worn away and we sanded the deck smooth and plan to paint it as well
Your bulkhead rot is a different problem and more serious. The bulkhead could fail letting the chainplates move, maybe rip out? I don't know if Elizabeth has an aluminum strut under the mast step? Passage had one and it carries the compression load - except it was badly corroded - I'm sure it caused a stress crack in the fiberglass tabbing to the bulkhead. Marionette has a wood arch and if rot got into it that would be really bad. If you haven't, check out http://www.dolphin24.org/about%20masts_etc.html
Replacing the whole clamp with the deck in place sounds like a lot of work. Maybe easier to lift the deck? I think good quality, well thought out repairs are the way to go. Very major jobs like lifting the deck is for guys who really love to do this stuff. I like it, don't love it.
Anyway, my guess is that you will need to repair that bulkhead and retab it to the hull and deck? Maybe the tabbing is still in good shape and you can fit and epoxy putty the new section into the old tabs? The chainplate load is transmitted from the chainplate bolts mostly to the hull tabbing and compressively vertically on the deck. If the strut is in good condition then the inboard joint of the new section is mostly non structural, I think
If you have the time take some pictures and keep notes. This is valuable stuff for the group.
Ron
*****************************
Halsey's response to the above email is below. He also sent in a picture of the removal of the bulkhead on the port side and a sketch. I embedded my response to the comments in CAPS.
Halsey
My comments are 'imbedded' IN CAPS in your email below
Ron
************************
ron,
thanks for the good info. i should let you know this all started with a modest project to increase the mast support. there was an aluminum tube that was corroded away just like the picture on the web site. the cabin was showing sings of fatigue. i bought a beautiful piece of oak to make an arch beam similar to the s/s memo. CHECK OUT http://www.dolphin24.org/marionettes_vberth.html
ITS HARD TO SEE BUT MARIONETTE'S ARCH IS SOMEWHAT WIDER, AND MAYBE THICKER, I THINK (I'LL HAVE TO MEASURE IT) AND 'DEEPER' IN THAT ITS VERTICAL POSTS ARE SHORTER THAN THAT SKETCH SHOWS. THE ARCH IS SANDWICHED BETWEEN SHEETS OF PLYWOOD WITH A GOOD ONE SIDE SURFACE GRAIN OUT WHICH GIVES A VARNISHED SURFACE IN BOTH CABINS
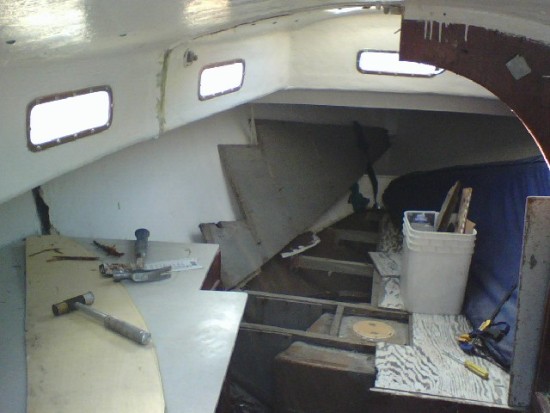
then i noticed the ply wood at the chain plate was soft and discolored. there is always more than you can see, so i dug deeper. peeling back some of the glass over the sheer revealed what i hoped not to find.
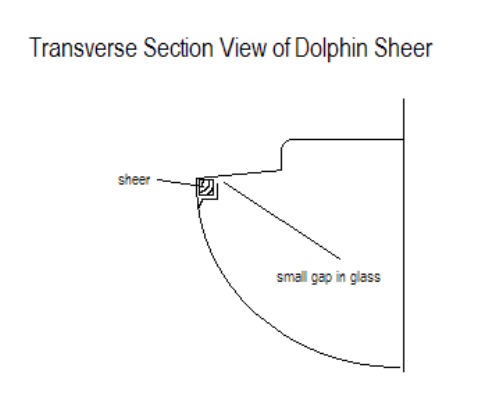
i was thinking that i might be able to use some thing like Git Rot to rejuvenate most of the sheer. there are a few issues that lead up to the rot. first being a leaky deck at the chain plate. secondly the way that the sheer was glassed over. instead of wasting my time explaining it i drew a picture (attached) it allows water to get in and holds it there. (you will have to forgive the drawing, its the best i could do in the library)
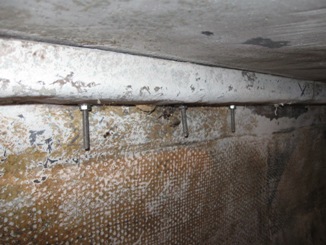 UPDATED APRIL 26, 2009. NICE DRAWING - MAYBE THIS WAS DESIGNED IN/OUT AIR TO LET THE CLAMP DRY OUT? MORE LIKELY THE GAP IS CAUSED BY THE CLAMP DELAMINATING FROM THE DECK. THE PICTURE AT LEFT IS A SECTION OF PASSAGE'S CLAMP. YOU CAN SLIP A THIN BLADE IN 2-3 INCHES. NOTE THE 2" TABBING TO THE HULL UPDATED APRIL 26, 2009. NICE DRAWING - MAYBE THIS WAS DESIGNED IN/OUT AIR TO LET THE CLAMP DRY OUT? MORE LIKELY THE GAP IS CAUSED BY THE CLAMP DELAMINATING FROM THE DECK. THE PICTURE AT LEFT IS A SECTION OF PASSAGE'S CLAMP. YOU CAN SLIP A THIN BLADE IN 2-3 INCHES. NOTE THE 2" TABBING TO THE HULL
THE WATER GETS IN THROUGH THE FASTENER 'GAPS' AROUND THE STANCHION BASE BOLTS AND THE TOE RAIL/GENOA TRACK BOLTS - AND ARE HARD TO SEAL WELL IN ANY EVENT - AND POOR CAULKING AROUND THE CHAIN PLATES. UNLESS I AM MISSING SOMETHING YOUR WATER GETS IN THE SAME WAY MINE DOES?
my plan is to remove the fiberglass, (which is rather thick! i am impressed and pleased with the robust construction though) allowing the wood to dry out before epoxying it. then glass over it. the bulkhead is already out and mostly ready for a new one. i am planning on using 3/4" marine. also attached is a pic half way through bulkhead removal.
THAT'S A VERY CLEAN LOOKING REMOVAL ON THE PORT SIDE - LIKE MAYBE THERE WAS NO LONGER A BOND, OR NOT MUCH OF ONE, BETWEEN THE BULKHEAD AND HULL, AND THE BULKHEAD AND FIBERGLASS TABBING? SOMEONE, I FORGET WHO, TOLD ME THEY HEAVILY EPOXY PUTTIED THE HULL AND END OF THE BULKHEAD AND MECHANICALLY, TEMPORARILY HELD THE BULKHEAD IN PLACE, AND THEN NEATLY GLASS TAPED THE BULKHEAD AND HULL/CABIN ROOF TO EACH OTHER. THEY USED A RELEASE TAPE TO ALIGN THE GLASS ON THE BUKLHEAD AND GET A NEAT CONTOURED EDGE. THEN, AS IT CURED THEY FOLDED OVER ANY EPOXY ON THE RELEASE TAPE ON TOP OF THE EPOXY COVERED GLASS TAPE TO GET A CLEAN EDGE. AFTER EVERYTHING IS CURED PULL OFF THE RELEASE TAPE
in regards to big jobs, i am like you i like it, but don't love it. but i am stupid enough to do the work myself, the thought of hiring someone never crossed my mind. i work in the marine industry; from a steel ship to a wooden schooner and tugboats. i am used to doing frustrating large projects on vessels. that's just the way boats are, right? HERE I AM GIVING ADVICE TO A PRO!!
best regards,
halsey
***********************
ron,
first off i am no pro. besides, its when you think you know what your doing that things go wrong. i never assume to know anything. i have a pretty good plan for a sturdy mast support. the clamp glass doesn't look like who ever did it thought about air flow, more like laziness. most of the water seems to have come in the through the chain plate. in addition the small gap i drew, running the length of the sheer would allow any condensation on the overhead to roll right into the sheer. i plan to glass it over completely. don't let the picture fool you there was quite a bond. i fought tooth and nail to get that bulkhead out. half way through the ordeal i thought to myself "i wonder if i even need to replace it" after the point of no return of course. i wish i could have lived in willful ignorance. but i would stress too much to have a good time wondering when something was going to break.
best,
halsey
*****************************
On April 9, 2009 Halsey updated us on the sheer clamp part of this project, excerpted from his email below:
As for the sheer clamp part of the project I rationalized that the clamp is not as structural as I fist thought, after looking at many other hull-deck techniques on other comparable boats and consulting a marine surveyor friend. This was some what of an easy decision to make since I had the itch to go sailing.
*****************************
April 9, 2009 - Replacing the main bulkhead
Halsey has replaced his main bulkhead and sent in the following email (edited) and picture
Ron
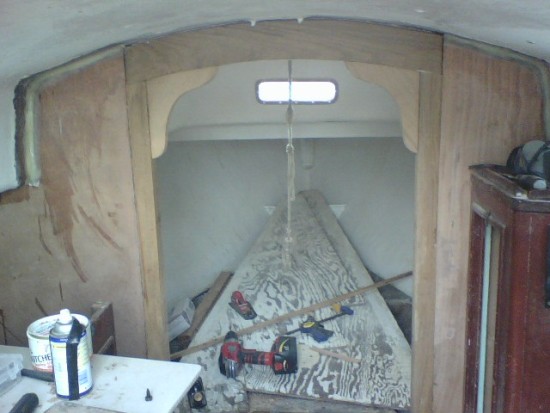
I've attached a photo of a completed, though "unfinished" main bulkhead and mast arch I did last season. The bulkhead is 3/4" marine ply tabbed to the hull, the arch and pillars are 3" thick white oak. the arch extends behind the bulkhead, and the pillars sit on a floor beam (not pictured) of white oak to help distribute weight. I am very happy with the results, it's solid as a rock.
I plan on painting the plywood white and varnishing the oak
Halsey
*******************
|